Monday, July 29, 2013

Mobile Making MANIA.

Perhaps the title is a bit overstated.  But we did make a mobile.

Sarah had seen this mobile that she liked, and we decided to do our own modified version of it. We really like the whole mid-century vibe, so the atomic ball thing seemed like a great idea. A continuous thanks to everyone in Raleigh who keeps tearing down the few mid-century houses in town to put up your McMansion!

So here was the actual inspiration, from her Pinterest board.  Whatever that is.

This one was apparently made using a pre-bought picture mobile frame and then attaching Christmas ornaments to the ends.  Well, guess what?  It's July.  Good luck finding those.  Plus, we're creative people...we could figure out another solution.  So we went to AC Moore for about 20 minutes and brainstormed.  (It was a nice little Saturday.)

The supplies were surprisingly cheap:


  • a 2.5" diameter wood ball for the center
  • four 36" long x 3/16" diameter rods 
  • (1) pack of (18) 1/2" diameter balls for the ends
  • wood glue
  • fishing wire
Total came to about $12.

Sarah marked spots on the center ball where I was going to drill holes for the rods to come out.  I had also purchased a 1/4" bolt to attach the ball to a scrap piece of wood to hold it in place while I drilled these holes.


Look closely and you can see her marks, which she assures me are not "willy nilly."
And then I drilled in pilot holes about 1/4"-1/2" deep.  


One hole down.
While I did this (and clearly, after she'd taken the above pictures), Sarah was marking the rods into random lengths for me to cut next.

Also, apparently, not willy nilly lengths.
Then I just wood glued them into the previously mentioned holes. 
Check out the socks, hitched up due to the insane amount of mosquitoes outside.


Structure complete!  (For reference, all of this took about 45 minutes in total.  Including pee breaks. Three, to be specific.)

Then it was time to paint the structure white. And let me tell you - 3/16" diameter rods sticking out at random lengths make for a fairly delicate structure. I bet you're wondering how I managed to put it all together and apply several coats of spray paint without breaking it! Well, I never said I didn't break it. I actually only broke off one rod when I got too close with the spray paint and knocked it off the ledge it was on. I don't think the fall itself would've broken it. My trying to catch it did. After struggling a bit with how to fix this (note: tape isn't going to work), I cut off the little broken piece still glued in very close to the ball. Then I whittled, yeah - that's pretty much what it was, out the remaining bit from inside the ball. Well, enough to sharpen the broken end of the rod and jam it in there. It worked, and you can't tell which one it was.

While I was out somewhere, probably playing a show or working out if it was a weekend, Sarah took over. She ripped out pages from what appears to be a Victoria's Secret catalog to work inside, because it was July in NC and that means it was hot and really muggy and she is retaining water "like a friggin' camel" (her words, not mine). First she glued the smaller wooden balls to the ends of the rods.

Maybe it was a Coldwater Creek catalog? That's definitely not something I should know about at all.
That pack of balls we bought for the end had holes pre-drilled AND at the right diameter for the rods, but the holes went all the way through. And yes, I'm laughing every time I say balls, but I don't really have many other options here... should I have been calling them atoms? Protons and electrons? Nuclei? Balls it is! Being the master crafter she is, she filled the ends with wood puddy putty.


Time to paint the balls. Because there is a lot of crafting/artwork done in our house, there was already a lot of little bottles of paint around, and we wanted to try to match the colors in the alphabet print.

Rods were taped off at the end so as to make painting the colors way easier.
All end balls painted.
Apparently each color needed two coats to get a nice saturated look.  But once it was all painted and dried, Sarah gave it a layer of sealer to give it a finished look.

Had this on hand, too.  B/c my wife is a craft hoarder.

And all that was left to do was hang it! This took several weeks, because we had to do stuff like get the crib in place and continue living our fairly busy lives. I do realize the irony of calling our lives busy when our kid isn't even here yet.  But as many of you know, we had not one, but two plumbing incidents (one semi-major) in the house that took priority over the mobile.

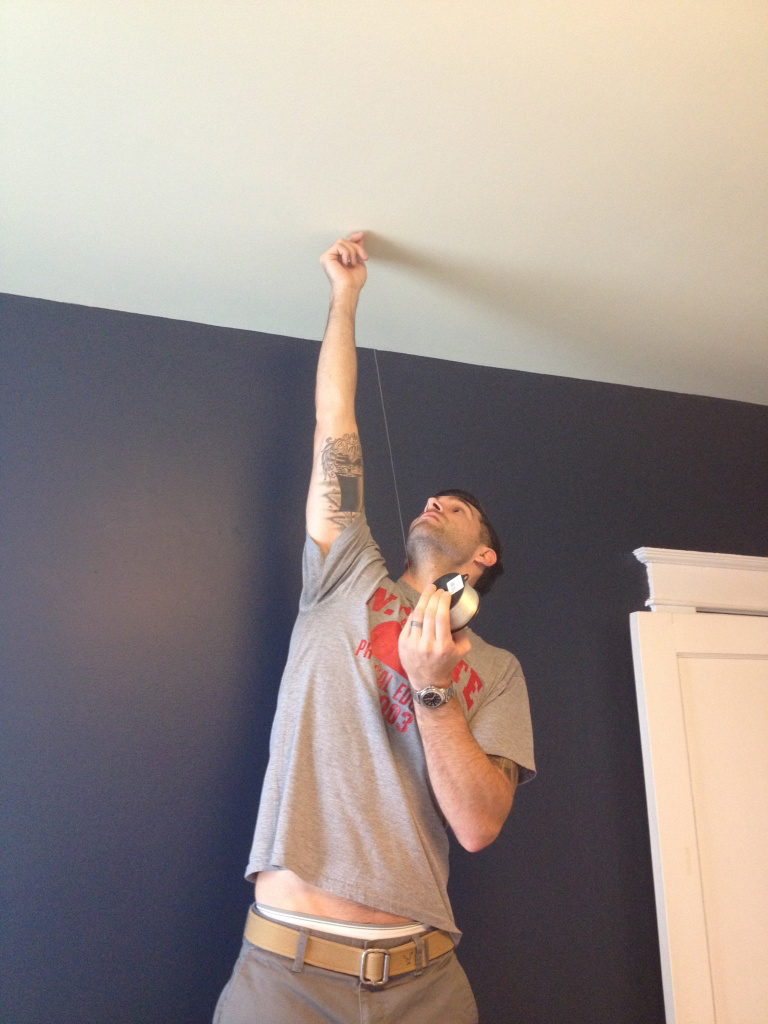
We wanted it centered on the door as you walk in, and over the crib, so while I stood on a chair, Sarah told me where to screw the hook into the ceiling. I had already attached some 40lb test fishing line to this hook. After cutting the fishing line to a workable length, we got the mobile to a good height and I tied about 50 knots to hold it in place.
Belly shot!

And that was it! Our awesome ballsy atomic mobile was done!
Camera 1.
Camera 2.
Looks pretty good, if you ask me.  Sarah likes it most because nobody else has one like it.  She must be a hipster deep down.  It was nice to make something special just for our little dude.  One day I'll tell him about how we did it and we'll be all:

He'll be so impressed.


Monday, July 1, 2013

Update in progress...

Top o' the mornin' y'all.

If we waited to reveal the nursery until it was 100% complete, P-Nut would be 3-1/2 years old and begging for a big boy bed.  So we thought we'd keep showing pieces bit by bit as they get complete.  It helps us feel like we're actually making some progress, and hopefully keeps the 5 of you that read this blog interested in what we're doing.  (We're known for going weeks, sometimes months, between posts.)

When we last met, my hunka-hunka-burnin' husband had just written up a quick tutorial on how we added the herringbone feature wall to the mix.  We purposely didn't show a great after picture because...well, we didn't have one.  There was still crap everywhere blocking a good view and our OCD personalities were keeping us chained to the wall making tiny touch-ups here and there.  Well...there's still a lot about the room below you'll never see again, but it's a good start.

If you're finding yourself wanting to pet the wall, I can't blame you.
The high contrast of the white and navy makes me tingle.  Well, it's either that or the baby sitting on my sciatic nerve again. A little from column A, a little from column B.


And what's that colorful print I see?  As I mentioned before, my artsy fartsy husband was going to make a custom print for our son-to-be that we would be hanging in a salvaged frame from the beach.

I took the original art and mat out and gave it a quick coat of white spray paint to freshen it up.

It's balancing on a pile of trees and branches that came down in our yard that our landlord lovingly dumped to the side of the yard rather than removing.

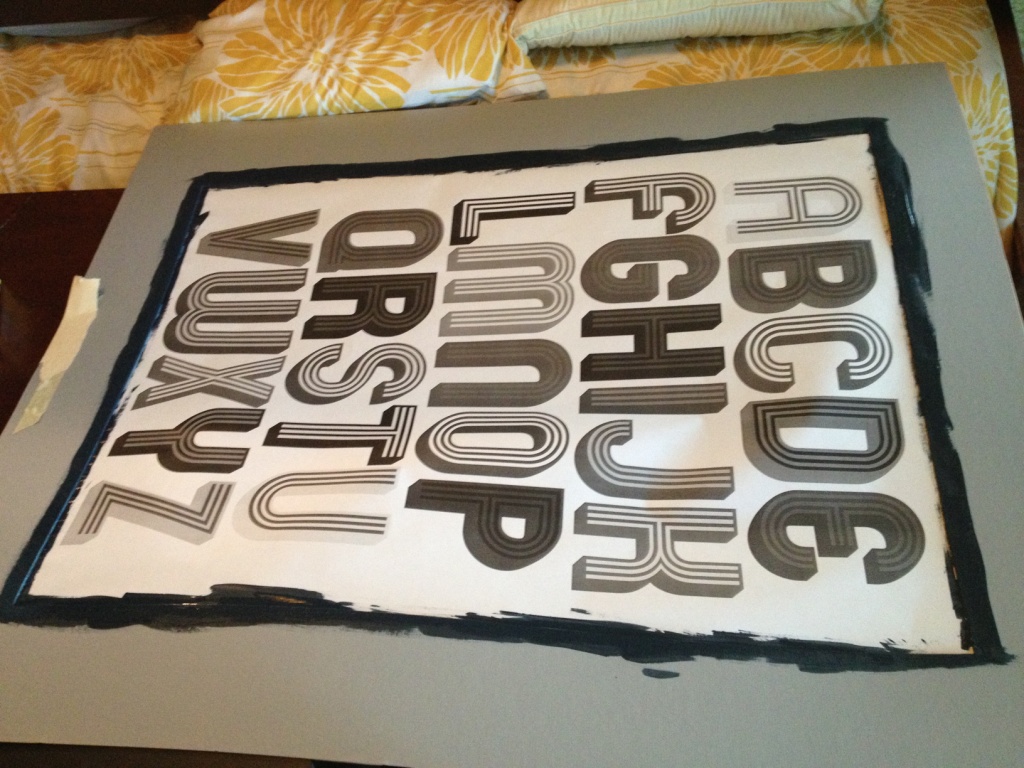
Then I took the secondary mat that was underneath the white to create a border and painted it the same navy as the walls with some leftover paint.

There's that black & white test fit I mentioned a week or so ago.  

Once it had a few hours to cure, we put the color print in place with some tape and framed that puppy.  (By the time all this came together and got hung on the wall, it was night time, so that's why the color is a little off.)


Next time won't you sing with me?

I love that it's colorful, fun and bright but still modern.  And did I mention CHEAP?  I love finding old frames/mats at yard sales or Goodwill and giving them new life.  The wood of this frame was actually the perfect color and shape, but spray paint can do wonders in helping you integrate a wonky old frame into your chic abode.   Buying a frame and mat of this size brand new would have been dumb.  Yeah, I said it.  Dumb.

Speaking of making wise financial decisions...I think it's time to drop the bomb on y'all.

We have been searching for quite literally...the duration of my pregnancy (30 weeks now!) for the perfect nursery chair.  The criteria included:

  1. Comfort: Do I want to sit in this for an hour if needed?
  2. Style: If People Magazine were doing a feature of Best Dressed Chairs, would ours be the Gwyneth Paltrow or Tila Tequila? Who even mentions Tila Tequila anymore?
  3. Cost: We're not doctors over here.  We don't drop hundos like it ain't no thing.  We've been known to eat Ramen noodles to keep our budget in line.  It needed to be a steal.
  4. Longevity: Will we be able to use the chair after its life in the nursery?  Our beef with the gliders and rockers that a lot of folks use is that they are now stowed away in the attic, not being used.  We want to use this chair for as long as possible to get the most bang for our buck.

Me and Craig (of Craigslist) have become pretty tight over the past few months and we hang out on the reg. Well last Tuesday, the chair heavens opened up and we pounced.

Thursday afternoon, we scheduled a time to come look at the chair/ottoman combo taunting me from my computer screen.  We had a really strong suspicion we would be walking away with this treasure so we emptied out the back of the truck in anticipation and hit up the ATM.

To answer your question, you need at least $1,000 to make it rain.
The guy described his house as being in "West Cary."  Well Nick and I both grew up in Cary and the part of town we drove to was considered Kentucky when we were growing up.  Homeboy lived about 40 minutes from us.  But onward we pressed.

We walked into their house and were led back to the rear office.  I honestly think beams of light were emanating from underneath the door as we approached.  We both took turns sitting in it, kicking our feet up on the ottoman.  I got up and inspected all the leather and framing.  It was made in the 60's but looked almost new with the exception of a small rip in the ottoman.  

"We'll take it."  Nick handed over the $200 to the nice gentleman and we were on our way.  

The entire ride home we kept glancing in the rear view mirror or turning around at stop lights to look at her.  

"She's beautiful."
"I can't believe that's our chair."
"I can't believe he sold that to us for $200."
"You wanna stop on the side of the road and sit in it for a while?"

Into the house she came and we settled her into place in her new home.

I peed myself a little just looking at the picture.
So not only is she extremely comfortable to sit in...not only is she the most beautiful chair we've ever owned...not only was she 200 bones...but she will be a member of this family for many years to come.  Nick has already claimed her as his "record-listening, fatherly advice, counseling, general manliness chair" post-nursery use. 

Note: this is not an original Eames chair.  It is a replica.  It was made in the 1960's but an original Eames would be close to $4K.   The original Eames chair was not designed as a true lounge and typically is not as comfortable as their knock-off counterparts.  They were originally intended to sit in the corners of offices as art pieces...not for long term sitting.  


We have a lot of close friends who are artists of various mediums and I know a lot of them have strong opinions about knock-off/replica designs.  I have a lot of thoughts on this matter so I'd love to sit down and have coffee with you one day to debate.  You'll, of course, be buying the coffee because I'm clearly the cheapskate in this situation.


So that's the update for now.   I'm currently on the hunt for new bedding for the guest bed, dreaming up something to do to the side tables, and we're about half way through building this custom mobile.  Fingers crossed!


Thursday, June 27, 2013

Paint Down the Walls!

So none of you get the title? That's OK - like 98% of my humor, it was for my own amusement. But judging from comments about Sarah's last post, a lot of you loved the herringbone pattern wall. I can't blame you, it was a great idea. Now I bet you want to know how it went.

1. Cut a hole in a box Paint the wall the color that you want the stripes to be. In our case, white. We were lucky enough to have the superhandyman (my dad) do the painting for us. Most paint has VOCs (volatile organic compounds*) in it, and that's a no-no for preggos. No-VOC paint is way more expensive, and with Dad doing the painting while we were at work - not an issue.
* VOCs are fake, and were made up by parents and the government to keep us down.

2. Once that wall has cured, it's time to start taping verticals.
It's never a bad time for a guitar solo.

We sketched our layout on some paper, then measured out the verticals along the base trim. We had a little debate about the best way to tape the vertical stripes, as we have fairly high ceilings. We ended up going w/ one strip from the ceiling to the base trim. Even if it's not perfectly straight, it worked out better than trying to align multiple strips of tape.
One down. Notice that I'm also taping the ceiling edge while I'm up on the ladder.

Did you know that pregnant women should not be up on ladders? They shouldn't. It is a known scientific fact that babies steal their mother's brains and balance. So Sarah would somehow squeeze underneath the ladder as we moved down the wall. I'd run the tape down from the top and she'd take it the rest of the way.
She really looks up to me.
And the verticals are done.

3. Do all those angles. This is going to take a while if you're two people who work in architecture and like things to be precise. If you're not, maybe you just do it really half-assed. We used a 30/60/90 triangle - specifically the 30 part.
The angles - precise. The spacing - eyeballingly random.
Taping complete. Total time: Probably about 2 hours. We took a dinner break in the middle sometime. 

4. Paint over all that beautiful tape. In our case, my dad did this (again, big shoot out to Dad!) while we were at work. Let's clear something up real quick - Dad does a fair bit of contractor work. He's done some for several of our friends, and may do yours, too. We'll be happy to put you in touch with him. After he painted, it was time to pull that tape down. I bet you're wondering, "What kind of tape did you use?" We used the 1.88" version of this Scotch Blue Painter's Tape. Now, no tape is going to give you a 100% clean edge unless you're painting on glass, so we expected to have to do some touch-ups, even with the slightly more expensive tape.
Edge Lock Paintlock Protector?

5. Touch up the edges. For the most part, it was pretty clean. There were definitely some areas that needed some attention though. Again, being perfectionists, we were apt to spend all night working on cleaning up every line. It was tedious, and hard to focus while rockin' steady. (If you can't get down to that, then you shouldn't be getting down to this blog.) After an hour and a half or so of this:

... we decided to call this place exactly what it is (what it is what it is what is) - a funky low down feelin' an old rental house. We'll probably do a little bit more touch-up, but we love it!

Saturday, June 22, 2013

So what's the plan, Stan?

No, we are not naming our son Stan.  In fact, Husbo and I are 99.9% settled on boy Troutman's name (first and middle!).  This is huge progress for us.  Are we going to share that name with anyone?  No.  Not til he's here.  That .1% chance we'll want to change it leaves that door closed.  But we're pretty proud of ourselves for choosing finally.  And did I mention we completed our registries?  Yup.  Super parents.

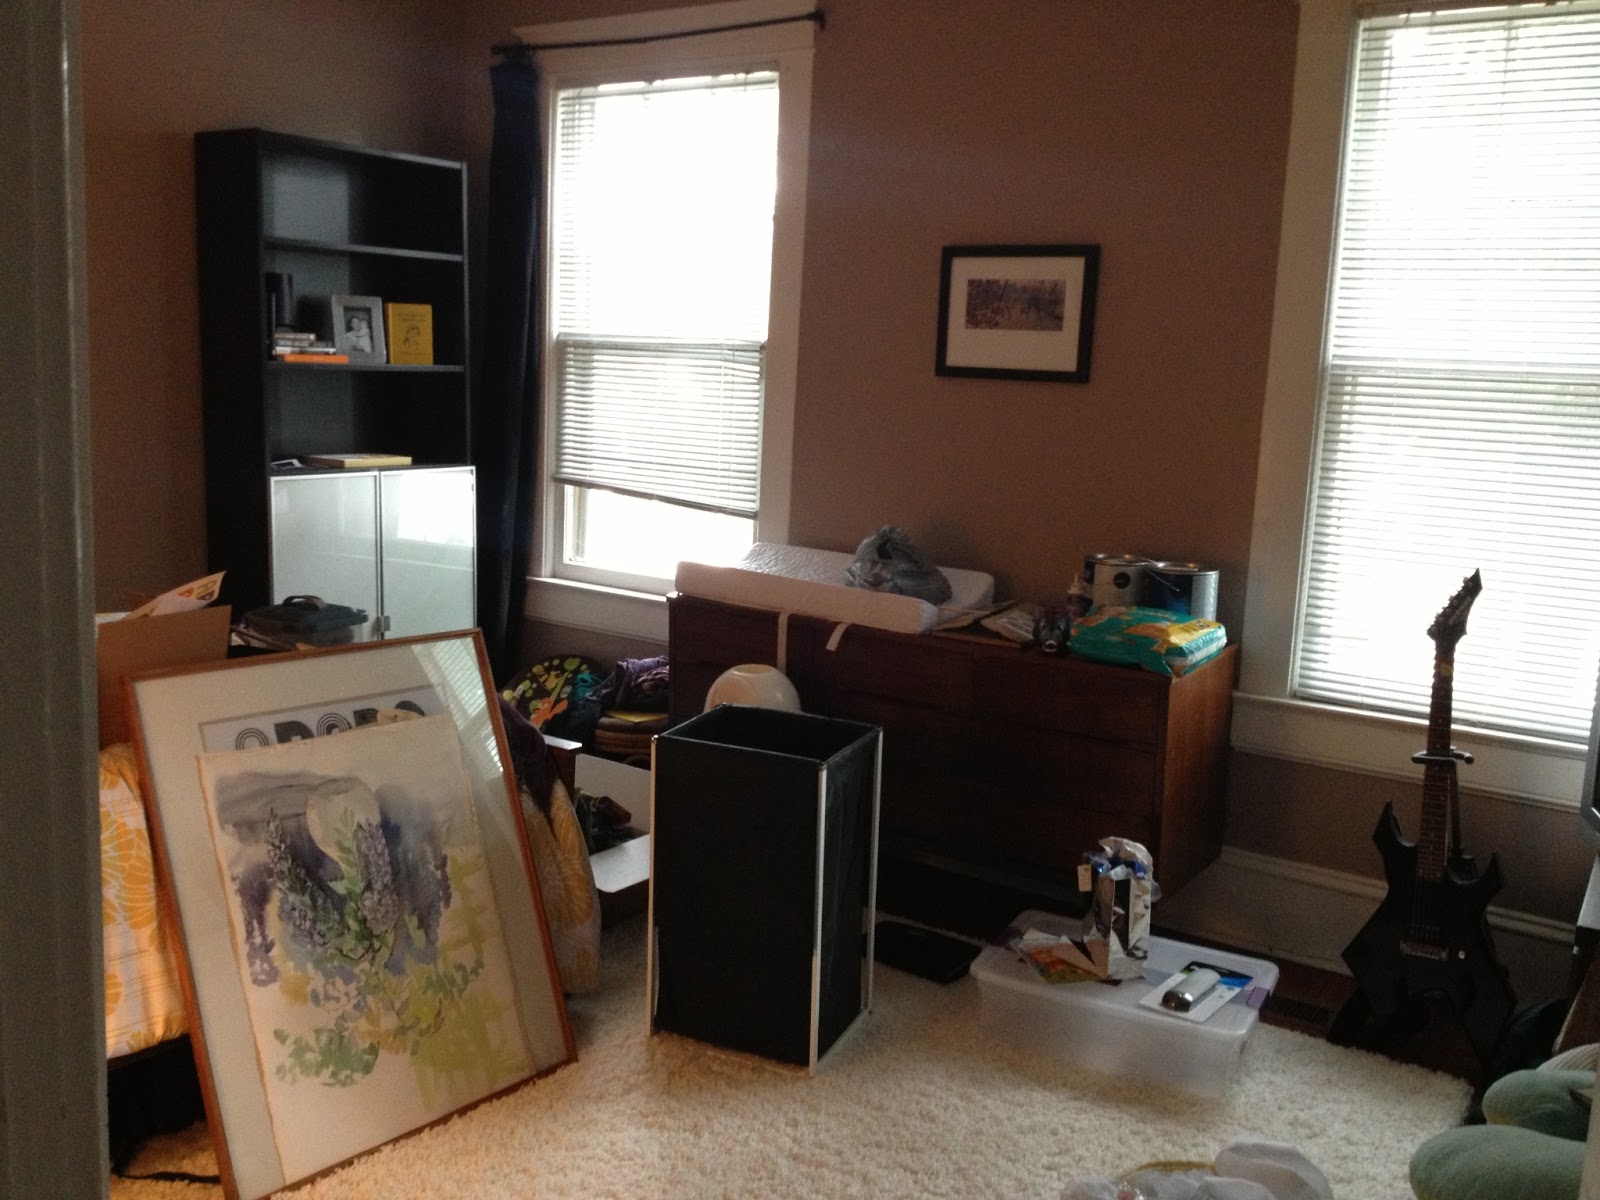
Until, of course, you look at the state of his nursery:

(Image can also be found under Webster's definition for "anxiety-inducing.")

This hot mess of a room has become the catch all for all the hand-me-downs and random junk in our house.  Not exactly worthy of being called a finished room in Der Trautman Haus.

But ye of little faith...there is actually so much potential brewing in said room. The first is the general layout of the big stuff.  Back when I did the great furniture shuffle to get the office function out of his room, I also had a space plan in the works for P-Nut's digs.

And if you'll notice, a lot of that is actually in place.  First, we got the bed in position and moved the bookcase into the room.  We found an awesome dresser a few months ago on Craigslist that we'll be using as a changing table (after a few slight modifications).  A sweet friend of ours is giving us her crib in a few weeks.  The only real missing piece is that darn boob chair.  Most likely, I'll be nursing wherever my heart desires (and wherever my bum is most comfy) but as he gets older, we do like the idea of having a place to read to him.  If anyone is looking to get rid of a gently used Eames Lounge for super cheap, holla atcha girl.

But the plans are there.  So this post is all about the game plan.  Crossing our fingers for no butt fumbles.  (Google that reference if you're unfamiliar.  Sorry Jets fans but it's hilarious.)

The first big decision of any room?  Color.  For someone who designs space for a living, this is quite possibly the most difficult to narrow down.  When thinking about what I wanted the nursery to feel like, I wanted it to be obvious it was designed for a child, but avoid any type of "theme."  No offense to those who go that route, it just wasn't my cup of tea.  Or decaf coffee as the case has more recently been.

I've been crushing hard on navy blue for a while now.  And I got to thinking (pre-finding out the gender) that I could make navy walls work no matter what the gender was by switching up the accent colors.  So once we found out our baby had "outdoor plumbing," I decided on navy with spring green accents.

Mr. Valspar, if you're reading, I'll be happy to be endorsed for this plug.
The actual colors we (or let's be honest, I) chose: 4009-4 Fly-by-Night Blue for the walls, 6006-5 Tempered Sage for the ceiling (the forgotten canvas) and 7006-24 Ultra White for the stencil wall that I have yet to mention.

Nick's very sweet dad (or "Pippy" as we're hoping he'll one day be called) has offered to do the painting job for us so that should be getting underway soon.  Why paint the ceiling, you ask?  Well firstly...everyone always forgets about the ceiling.  Every room has 6 surfaces to consider: 4 walls, a floor and a ceiling.  If we owned our home, I'd probably do something a bit more elaborate.  But all things considered, paint would be quite spiffy.  One quick tip: any color on a ceiling will read MUCH darker when installed than it does on a chip.  So be wary of picking anything too dark unless that's the vibe you're trying to lay down.

The other reason to paint the ceiling?


The grody damage around the boob light.  I'm guessing there was a ceiling fan installed in the room at some point.  I feel like our kid is going to spend a lot of time staring at the ceiling and I don't want him to get a complex with this horrible breast light staring back at him.  So that'll be replaced too.  The very sweet Bemily generously picked up this fabulously simple light at Ikea.

You better WORK it, Alang.

Other items to be addressed:

Window treatments.  This is the current sad state of the room:

Cheap black curtain rod with some heavy black velvet curtains I made about 8 years ago.  They are great for blocking out light but with dark navy walls in our future, it would feel a bit too cave like in there.  So I'm thinking I'll be switching those out to something bright and white.  It may just be a solid white curtain depending on how pattern-heavy I feel like things are getting.  One of the things I alluded to earlier was the addition of a stenciled feature wall in the space.  

Like every breathing woman on earth, I too have been perusing Pinterest for inspiration.  This amazeballs herringbone pattern makes my heart skip a beat.

Don't get used to high quality images on this site.  Grainy iPhone pics 4 life!
And how baller does the white and navy look together?  Quite baller is the answer.

Another DIY project we'll be tackling?

(Source)
I spy with my little eye: a kick ass atomic style mobile.  So after about 5 minutes of brainstorming in AC Moore, we came home with this pile of potential:


If it turns out awesome, I'll write up a little tutorial.  If it turns out looking like a 2nd grader's failed science project depicting the solar system (long live Pluto!), let's pretend I never mentioned it.

And what's that giant thing leaning against the bed?

After doing some re-design at my parents' rental beach house, this yard sale artwork came home with moi.  The watercolor flower motif wasn't working at the coast and it really wasn't working in Casa de Troutman either.  But the frame and mat were working it like a boss.


So out came the flowers and in goes a custom graphic by the future Dad of the house.  You can see a little sneak peak of a black and white test print we did to make sure we liked the scale.  Stay tuned, suckas.

And rounding out the list: upgrading some of our existing stuff to blend in with the new baby-fab motif.

I'm thinking this guy gets painted white with a bright blue back wall.
These lamps and side tables are either getting replaced entirely or changed dramatically.  Either way, nobody is safe.  Including you, crazy yellow comforter.
We still have a few things we're trying to unload on Craigslist so I'm hoping to clear out a bit of the mess this week.  I'm pretty excited to see it start coming together.  I'm able to visualize it in my head but there are still a number of question marks I won't be able to settle on until I see the room develop.  We've got 11 weeks 'til life changes forever so I'm hoping this nesting instinct helps motivate me to tackle everything sooner rather than later.  Lord knows I won't have the energy once he's here.

And no, I don't watch Modern Family.  Haters gonna hate.


Sunday, May 12, 2013

Cribs.

It is quite possible that nobody actually cares about this mini-series we're getting ready to begin.  But nobody put a gun to your head and said "GO READ NICK AND SARAH'S BLOG!" so I'm going to assume you're here by choice.  If that's not the case, seems you have bigger problems to deal with at this point.

One of the only parts of pregnancy that I've enjoyed so far is planning for the nursery.  Up until my 18 week ultrasound, I had it in my head that P-Nut was in fact, a chick.  When we were told by the doctor that there was definite "outdoor plumbing," I was shocked.  Elated...thankful...excited...but shocked.  See, the nursery for this new Troutman was pretty well planned out in my noggin by that point.  And the design was for a girl.

Womp womp.

(Dear unborn son, should you ever stumble upon this blog one day: I am in no way disappointed that you are a boy.  You're going to be an awesome boy.  Whatever disappointment I felt was that my killer girl nursery ideas were going to have to be put on hold.  I'm crazy excited that you are a dude.  Love, Mom)

A couple months ago, when I was laid up with the winning combo of morning sickness and a sinus infection, I started to put some of my new "this baby is a boy" thoughts to (virtual) paper.  This is part one of a multi-part series on how we pimp out the new nursery.

Part One: Form Follows Function

The first thing I always consider in design is, "what does the space need to DO?"  We have a guest bedroom and a rather large master bedroom.  Four things need to happen in those two rooms.

1) Husbo and I need to sleep.
2) The baby needs to have a place to sleep.
3) We need to retain an office function with a desk and computer.
4) We'd like to keep a place for guests to sleep.

Pre-baby, we had the master bedroom and a guest bedroom/office combo.  

One half of a very messy guest bedroom, after all the lovely donations of mama friends.

The other half of the guest room, complete with Nick's old desk and chair.

The guest room never got the full design attention it deserved b/c it was always a hodge podge mix of hand-me-down furniture and a place to store extra "stuff."  Before I was married, it was also Bryna's room and later, Steph's.  So I never did much to fit it out.  Knowing it had the potential of always being a future baby's room, I never bothered spending any money in there.

Once I got knocked up...it was time to get real.

The guest room is pretty large so I felt like keeping a double bed in there with the nursery was doable.  That just meant the office function needed to find it's way into the master bedroom somehow.  

For those who have never been to our house, the master bedroom is about 21' long by 14' wide.  We'd always dedicated half the room to having a mini-living room in it with a couch, coffee table, TV and bookcase. 

Whaddup giant tube TV?
When you work together like Nick and I do, it's actually been a blessing to our marriage to have a 2nd hangout area in our home.  Sometimes you just need a bit of "me" time.  

Enter function #5 we decided to prioritize in the Great Nursery Shuffle: retain a 2nd TV/sitting area.

There was going to be no way to put a desk in the current layout..  First of all, the TV is the size of Mongolia.  The coffee table is 3' x 3' and required its own zip code.   With my saltines, gingerale and antibiotics handy, I broke out a quick space plan for that half of the room.

Couch stays, but we look at a desk/bookcase combo and try to find a more narrow coffee table.

For anyone thinking, "well I can't plan my space like that b/c I don't have that type of program." Fear not.  There are butt loads of free space planning programs online that you can try.  And they're quite simple to use.  This one is rather popular.

I did want to take it a step farther because when selling an idea to him, it's always nice to let Nick visualize what I'm seeing in my head.   So I threw the plan into 3D.


For those of you thinking "Well maybe I can space plan but I can't do that!"  Well...that might be true.  But I got a degree in interior design and you didn't.  I'd never expect to magically obtain the ability to do someone's taxes or diagnose strep throat.  But I'm not a CPA or doctor, now am I?

I had no idea what type of coffee table I'd find, so I just threw in something narrow as a placeholder.  And what you couldn't see in plan view was a flat screen TV on the wall.  I thought just maybe...by the time we sold a bunch of other stuff on Craiglist, we could find a way to afford a small TV for the wall.

I did have the Expedit unit in mind for the desk/bookcase combo.  So that was shown in 3D...but the rest was all a dream.  Once we sold most of the old stuff on Craigslist...it was time to start looking.

We picked up the desk unit a few weeks back when I was in Charlotte for Mandi's bachelorette weekend.   Then, my sister gave us a gift card to the Habitat Reuse store last summer and I found this beauty:

Great shape, solid wood, brass tipped legs.

Small tear in the leather upholstery but for the price (FREE!), it was perfect.
What wasn't working for me was that "hey I'm a professional business person" black vinyl seat.  My butt deserves more fun than that.  So I ordered a yard sample of fabric from one of my reps at work (yes for free...another perk of the job).

Hello, lova.
Hopefully everyone knows how to recover a seat cushion but quickly...

Remove the screws holding the seat down.

Center the fabric pattern (if applicable) and staple away.
Reattach seat w/ original screws.

Voila!

Then I went on a hunt for the coffee table.  As luck would have it, I found a great solid wood piece on Etsy...and her shop is located a mere 4 blocks from our house.

Midcentury lines with a small drawer for junk...$100.
 Put it all together and...

Ignore the cords.  We literally just hung that an hour ago and haven't had time to deal with them yet.

So here's the list after the last few weeks' progress:

1) Retain a place for Husbo and I to sleep.
2) Create a space for the baby to sleep.
3) Retain an office function with a desk and computer.
4) Keep a place for guests to sleep.
5) Retain a 2nd TV/sitting area.

It may look impressive from a "look how much we've checked off" perspective...


...but there's so much to be done.  The nursery ideas still aren't 100% finalized but I think I've finally narrowed down the perfect paint color.  Which is croosh (that's the phonetic abbreviation for "crucial.")

Hopefully I'll have an update soon.

Troutman, out!