Sunday, September 11, 2016

Ri-DECK-ulous.

I figured if we were going to come back to the blog, we might as well kick things off with a groan-inducing pun.  Ya welcome.

You guys...doing home renovations with two young kids is crazy.  Someone should commit us.  This deck project was the first major renovation we've tackled since adding Cora to our crew and it was amazing what a HUGE impact such a little nugget had on our schedule and overall approach to the project.  Her bedroom being the one just off the patio was a big factor.  When you've got 50 deck boards to cut but the princess is sleeping, FOR THE LOVE OF GOD DON'T WAKE THE BABY.

All that to say, this project was drawn out over the course of a few months.  We started demo on the old deck over Memorial Day weekend and the last touchups of stain were completed yesterday.  We basically worked 90% of Saturday mornings between then and now from about 7:30am-12:30pm.  Didn't have much rain this summer but sweet molasses it was hot.  So anything much after lunch was off limits due to a for real risk of heat exhaustion.  Thankfully, a good majority of those Saturdays, we had the tireless guidance and help of Nick's dad.  Without him, we'd have completed this project sometime 2nd quarter 2017.

Ok, enough chit chat.  Let's see pictures.  When we bought the house, we loved the giant size of the deck.  But it clearly had not been stained or sealed in many years.  It was basically one giant splinter.


And like the front yard, there were about 25 random and leggy boxwood bushes that surrounded it.  Hint: post these in the "free" section of Craigslist and people will come dig them up for you.  We did this back when we poured the pavers in the front and 90% of the stuff we wanted gone was removed without us ever having lifted a finger.

We knew we were going to replace the deck at some point and with our kids still young, we wanted to knock it out soon so that when they were old enough to want to run around out back for hours at a time, we had a place to sit and drink margaritas.  (Ok, this is my dream...not necessarily Nick's.)

Besides being dried and cracked, every carpenter bee in Raleigh took up residence in the pickets and posts.  You couldn't go outside during the spring months without being kamikazed.  So our hope was that if we removed all the old deck boards, pickets and posts, we might be able to retain the structure below to save on cost.

So one afternoon, when I was off having a baby play date with Cora and Carter napped, Nick just started pulling at the pickets. With his bare hands.  And they popped out like toothpicks.  (I'll pause here to ask forgiveness to all of you who have had cookouts or even just a late evening hang out with us on this death trap.  We had no idea how insanely rickety it really was.)


This is what I came home to.  "So I guess we're gonna redo the deck this summer?"
After some consultation with a couple colleagues at work and of course, Nick's dad, we determined we would rip out the stairs, but that the center support posts and joists could stay, if we beefed them up in a few areas and leveled them with sister joists in other areas.


Upon strong recommendation from Nick's dad (Carter calls him Papa so we'll stick with that from here on out), we got our lumber from Tarheel Wood Treating Co. out in Morrisville.  They were better priced than the big box stores, and the wood was slated to take much less time to "rest" before we could ultimately stain it.  (Note: treated wood has to dry out before it accepts any type of stain or sealer.  With fall right around the corner, we didn't want to wait the standard 3+ months and find ourselves with a leafy decoupage mess.)

Their customer service was top notch as well.  One drizzly Saturday morning in July, the wood arrived.  (They were closing the entire week of July 4th and made a special delivery for us that Saturday so we could work that week.)


And hi-ho, hi-ho, 'twas off to work we went.


Troutman and Sons.


Please note how busted the brick at the edge of the patio is here.  I'll address this in a minute...
With the new exterior posts set in more than 6" of concrete (oh, former owner...your knowledge of code was interesting) and the deck boards laid, we had a great dance floor.  But seeing as Cora and I were the only ones interested in that, we continued on with the hand rails and steps.


Rather than going back with the traditional picket style railing, we opted for a more modern and visually-light option of cable.  We researched various ways to achieve this (DIY, pre-fab system) and ultimately decided to buy a Rail Easy system.  It was more expensive than coming up with our own version, but since this hopes to be a long term investment that we'll enjoy for many many years, we wanted the clean, streamlined look of the cable and simple fluted connections at the corners.  With the posts drilled in the morning, Nick and I spent a couple nights after the kids were down installing the cable.   (Warning: the following pics are from Nick's phone after he got a $5 lens to play with.  He got real artsy.)


Then we had to deal with the patio.  I'd like to say we had this whole thing figured out before we swung the first hammer, but we were, in many ways, designing this as we went along.  As you may have noticed in the picture, the brick that faced the patio off the living room was chipped, cracked and falling apart.  Masonry is not in our wheelhouse and even if it were, it's virtually impossible to get new brick to match old.  We knew we had to come up with a way to hide the crazy mess and also incorporate a nice way to access both the patio and deck area.

Again, after bouncing some ideas off of colleagues at work, we landed on a planter box.  After building a slatted screen wall at the front to hide our hose, we decided this would be a consistent look for the exterior and also hide the facade of the patio once we removed all the old, cracked bricks.

We painted what was exposed with roofing tar (for moisture resistance) and then Nick did some fun math to figure out the size of the boards vs how high the box should be, while considering how big the stair boxes needed to be, how to minimize waste, and how deep to make the planter.  The man is sexy, funny and a construction genius.  The classic trifecta.


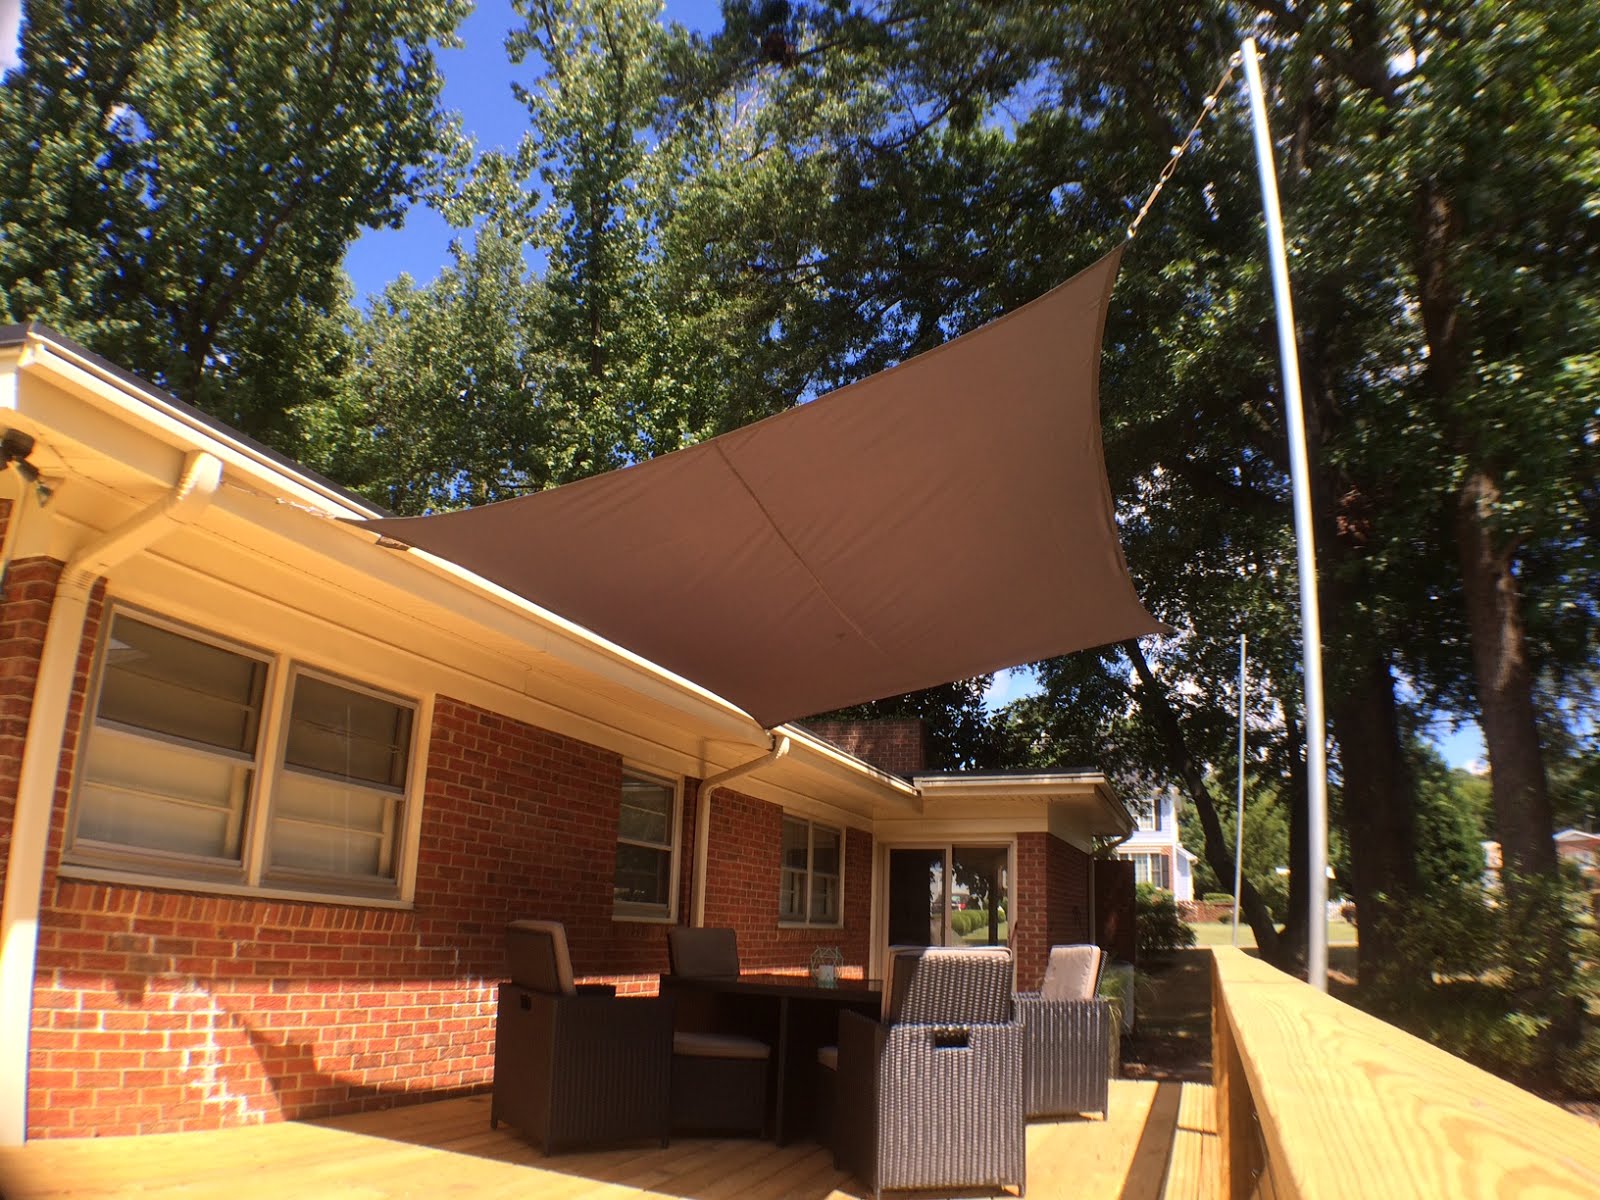
The one element I really wanted to incorporate was a shade sail.  We had a screened porch growing up, and I loved it.  Everyone loves screened porches.  Well the slope of our house's roof wasn't having it.  And the idea of building one on our own was terrifying.  And after around 12:30 (quittin' time) the sun has come up over the trees and beats down hard on the side and rear of the house until about 4:30 or 5.  We wanted to have an area of shade but also create a sense of scale that gave you the feel of a "room"...much like a screened porch would do.

We went with a Kookaburra sail and fashioned a mounting system that can be taken down easily in the cooler months (or a big storm like, say, Hurricane Hermine).  The one note I'll say here is that we first went with electrical conduit as a pipe (EMP).  Cheaper and thinner.  With the height we were maintaining, we couldn't get enough rigidity to keep the sail taught.  So we ultimately went back and bought galvanized plumbing pipe (which we should have just followed our instincts to begin with) and have had no problem since.


This was before we switched the pipes.  Notice the way they bend.


All of this was was done just in time for Carter's 3rd birthday party.  It was nice to show off the work but it bothered me that it was still not stained.  Driving down the road, you catch a glimpse of the deck and it glowed.  Like when you've been tanning all summer and after sliding down an epic water park twister, you get a giant wedgie and your bare white bum blinds the kids behind you when you stand up*.

*May have happened in 7th grade.  To whom, I won't say.

So over Labor Day weekend, the wood had cured long enough that we were able to tackle the final step.  All of the wood inside our house (the doors and most of the furniture we've collected) is a mid tone brown.  I like to call it acorn.  And after stripping our front door of the neon green paint and staining it a similar tone, there was a precedence for the color we used here.  After a pow-wow with the nice man at Lowes, we went with Olympic Elite, oil based stain and sealer (semi-transparent) in Canyon Sunset.

And the angels sang.


But before I hit you with the real final pictures, let's just remember one more time what the before looked like:


And today:


Before:


After:


And then an onslaught of other angles:

Power washing does wonders for a patio.


Chairs by Ikea.  Future margaritas by Jose Cuervo.


We haven't decided what we want to do to "finish" the underside of the deck.  May do some type of slats.  May do a version of lattice.  May come back with some type of planting.  But if you turn your head down to the left you'll see what our next project (as in, next Spring) will be.

It's been beat with the ugly stick.

We'd like to build a patio with some built in features (fire pit, grill, benches) back here so we may wait to see how that comes together before tying it to the deck.

For now, we're proud of the end result and look forward to sleeping again.  LOL, jk.  The baby doesn't sleep.


Tuesday, September 15, 2015

If you can't stand the heat, get out of our newly renovated kitchen.

Well this is it. The final kitchen post. It's gonna be picture heavy, but we did promise to share what we learned as well. So here goes.

Remember what we moved in to? A tiny wall oven, drawers and doors that wouldn't open unless the dishwasher was open, a washing machine in the kitchen with the dryer in another room (which we covered here), and some very shiny wood paneling. You'll see the pictures below.

Yeah, everything worked. But it could use some major updating.

Renovations are hard work. Get help - friends, family, anyone you can get. We had all of the above, and couldn't not have done it without them. Call in professionals when you need to. They are professionals for a reason. Usually. Sometimes they are tile installers and you're better off doing it yourself.

Go ahead and accept the fact that your floors aren't level. Your walls aren't square either, by the way. Make a schedule and stick to it. But you'll discover things along the way and that schedule will go out the window. Also try not to break any windows unless you really mean to. You're gonna mess up, and that's ok.

Now what you all came for, the picture show!  (Disclaimer: there is so much natural daylight that comes in that it makes the photos crazy wonky.  So we took the pictures at night.  With our iPhones.  (Are you officially prepared to be underwhelmed?) That being said, you're better off coming for a visit.  Which we would welcome!)

Before...
AFTER.
We did it, TLC. We went chasing waterfalls - because rivers and lakes are gross.

Before...
AFTER.
Before...
AFTER.
And now for some details...

Interior side with the big drawer fronts. Stay tuned for more details!
Oh yeah that's a drawer WITHIN a drawer. Jealous?
Range and hood... that we had to custom cut because of our sloped ceiling.
Oh what's up integrated panel dishwasher! Have you been hiding there this whole time?
Under sink storage - which also required a custom cut because of the sink plumbing.
More hidden drawer storage above the trash and recycling.

Remember when the washing machine was in this corner? Me neither.
Sarah's got a bit of obsession with Raleigh-themed art.
Where priss meets punk - old show flyers done in a style that matches the kitchen.
View from the den, complete with patterned stairs.

So there's our renovated kitchen. We still have 2 bathrooms to do, and a lot of exterior landscaping/patio/deck stuff planned once we get settled with Mini Sarah, but this is probably the biggest thing we'll have tackled in our DIY careers. And we're done. I don't hate it.

Monday, July 27, 2015

It's Backsplashin' Time

Captain Ahab's white whale. Jay Gatsby's green light. Monty Python's Holy Grail. Sarah's penny hex tile backsplash.

The thorn in our side keeping us from wrapping up this kitchen renovation. Several weeks ago, we had a Saturday planned to knock this thing out. There was quite a list of seemingly small tasks we wanted to tackle. Well, D had to be done before C, C had to be done before B, and B had turned into a royal pain in the A. By the time we got to the backsplash, I had to head out for band practice. Sarah and my dad went to work, and knocked out a small corner in the few hours I was gone.

Measured, cut, ready to install.

To say they were frustrated would be a bit of an understatement. Using the wet tile saw dampened the adhesive holding the tiles to the sheet, and they'd fall apart. Hand snippers took forever and made jagged cuts. But there was no turning back now.

Oh that's gonna look GOOD.

The next day, Dad calls. "Consider your backsplash done." What??? If you've read the blog before, you know dad does a bit of handy work. He called the tile guy he'd worked with before, and offered to pay for him to come finish it up. Uhh, YES PLEASE THANK YOU VERY MUCH! Even with all the help dad has given us throughout this process, this was possibly the biggest help.

Monday morning, dad's tile guy arrives. An hour late. Ok, I get it. You're doing someone a favor, contractors are almost notoriously late, etc. He then spends 15 minutes complaining about the tile we've chosen - how hard it is to cut and install - and ups the quote he gave dad by several hundo. Sarah didn't get a good vibe from this dude AT ALL. I mean, he's a professional tile installer, and the first thing he does on a job is start complaining? I tried this at my job and it didn't go over so well. Anyway, besides just plain not liking the guy, Sarah definitely didn't have the go-ahead to pay a lot more money than dad had offered. She asked him to leave.

This was a whole new level of frustration. Sarah emailed her tile rep, told her the dealio, and asked for a few installer recommendations. She took some pictures, contacted the installers, and waited for quotes. After some back and forth, we settled on a guy to come knock it out.

Installer #2, let's call him Chaz, comes the next week. We were so excited to come home from work and have our backsplash done. Halfway thru the morning, Sarah gets a call from Chaz. He says he should be halfway through, and he's gone about 2 feet. This tile has him beat. I mean, Chaz really felt defeated and was very apologetic. He didn't even charge us for his time. The wet saw wasn't working for him, and neither was using a dry saw. He thought this might be a bad batch from the installer or something like that. Yet another huge bummer.


Sarah contacts her rep again, who contacts the manufacturer, who gives recommendations on how to cut the tile. Put tape across the sheet where you are going to cut, and THEN use the dry saw. Sarah reaches out to Chaz again, and he's anxious to give it another shot, but after some phone tag we make the decision that we're just gonna have to do this ourselves. When? Well that's another story.

I was headed out for a weekend with the band, and Sarah had a weekend alone with the little project manager. He may be cute but he is AWFUL with a tile saw. Long story short, we had van problems and ended up coming home late Friday night. Dad came over Saturday, and they were gonna knock out that backsplash!

The manufacturer's recommendation of taping the sheets before the cut worked like a charm. Sure, it still took a while. But it was really happening.


Once C was down for his nap, I was able to help out. And that's when we realized we didn't have enough tile. I guess cutting the sheets messed up our math, because we did the square footage calculations like 5 times. Luckily, the shop is just down the street AND had some in stock. Dad had to leave later in the afternoon, but Sarah - like the determined champion - kept fighting. There were some spots where her pregnant belly wouldn't let her reach and I chipped in, but this was all her. This was her pièce de résistance. And she crushed it.


Then we grouted. And this massive kitchen renovation has light at the end of the tunnel.


Next up: the final overview. What we knew going in, what we learned, how dumb we are, what we can do better, how much you'll have to pay us to do this at your house, and some more hilarious gifs.